本脚本适用环境
系统支持:CentOS 6+,Debian 7+,Ubuntu 12+
内存要求:≥128M
日期 :2019 年 01 月 11 日
关于本脚本
1、一键安装 Shadowsocks-Python, ShadowsocksR, Shadowsocks-Go, Shadowsocks-libev 版(四选一)服务端;
2、各版本的启动脚本及配置文件名不再重合;
3、每次运行可安装一种版本;
4、支持以多次运行来安装多个版本,且各个版本可以共存(注意端口号需设成不同);
5、若已安装多个版本,则卸载时也需多次运行(每次卸载一种);
友情提示:如果你有问题,请先阅读这篇《Shadowsocks Troubleshooting》之后再询问。
默认配置
服务器端口:自己设定(如不设定,默认从 9000-19999 之间随机生成)
密码:自己设定(如不设定,默认为 teddysun.com)
加密方式:自己设定(如不设定,Python 和 libev 版默认为 aes-256-gcm,R 和 Go 版默认为 aes-256-cfb)
协议(protocol):自己设定(如不设定,默认为 origin)(仅限 ShadowsocksR 版)
混淆(obfs):自己设定(如不设定,默认为 plain)(仅限 ShadowsocksR 版)
备注:脚本默认创建单用户配置文件,如需配置多用户,请手动修改相应的配置文件后重启即可。
客户端下载
常规版 Windows 客户端
https://github.com/shadowsocks/shadowsocks-windows/releases
ShadowsocksR 版 Windows 客户端
https://github.com/shadowsocksrr/shadowsocksr-csharp/releases
使用方法
使用root用户登录,运行以下命令:
wget --no-check-certificate -O shadowsocks-all.sh https://raw.githubusercontent.com/teddysun/shadowsocks_install/master/shadowsocks-all.sh
chmod +x shadowsocks-all.sh
./shadowsocks-all.sh 2>&1 | tee shadowsocks-all.log
安装完成后,脚本提示如下
Congratulations, your_shadowsocks_version install completed!
Your Server IP        :your_server_ip
Your Server Port      :your_server_port
Your Password         :your_password
Your Encryption Method:your_encryption_method

Your QR Code: (For Shadowsocks Windows, OSX, Android and iOS clients)
 ss://your_encryption_method:your_password@your_server_ip:your_server_port
Your QR Code has been saved as a PNG file path:
 your_path.png

Welcome to visit:https://teddysun.com/486.html
Enjoy it!
卸载方法
若已安装多个版本,则卸载时也需多次运行(每次卸载一种)
使用root用户登录,运行以下命令:
./shadowsocks-all.sh uninstall
启动脚本
启动脚本后面的参数含义,从左至右依次为:启动,停止,重启,查看状态。
Shadowsocks-Python 版:
/etc/init.d/shadowsocks-python start | stop | restart | status
ShadowsocksR 版:
/etc/init.d/shadowsocks-r start | stop | restart | status
Shadowsocks-Go 版:
/etc/init.d/shadowsocks-go start | stop | restart | status
Shadowsocks-libev 版:
/etc/init.d/shadowsocks-libev start | stop | restart | status
各版本默认配置文件
Shadowsocks-Python 版:
/etc/shadowsocks-python/config.json
ShadowsocksR 版:
/etc/shadowsocks-r/config.json
Shadowsocks-Go 版:
/etc/shadowsocks-go/config.json
Shadowsocks-libev 版:
/etc/shadowsocks-libev/config.json
更新日志
2019 年 01 月 11 日:
1、升级:libsodium 到最新版本 1.0.17;
2、升级:mbedtls 到最新版本 2.16.0;
2018 年 11 月 05 日:
1、升级:使用 Github 上最新代码编译出 Go 版二进制可执行文件,版本号 1.2.2。
2018 年 06 月 01 日:
1、修正:在启用了插件 simple-obfs 的情况下,libev 版启动失败的问题;
2、修正:在使用 /etc/init.d/shadowsocks-libev restart 命令重启 libev 版服务端时,偶尔出现的 “bind: Address already in use” 问题;
3、修正:移除 libev 版配置文件中的 local_address 字段;
4、修改:不再默认使用 root 用户启动,改为使用 nobody 用户启动 libev 版服务端 ss-server;
5、升级:mbedtls 到版本 2.9.0;
6、修改:libev 版启动脚本中的 -u 参数(即同时启用 TCP 和 UDP 模式),改到配置文件里配置为 “mode”: “tcp_and_udp”;
7、修改:libev 版配置文件的内置 NameServers 为 8.8.8.8,默认是从 /etc/resolv.conf 中取得。
2018 年 02 月 07 日:
1、修改:将默认端口从 8989 改为从 9000-19999 之间随机生成。
2018 年 02 月 06 日:
1、修改:ShadowsocksR 版为 ShadowsocksRR 最新版;
2、新增:ShadowsocksR 版的协议(protocol)增加了 4 个,分别为:
auth_chain_c
auth_chain_d
auth_chain_e
auth_chain_f
2017 年 12 月 29 日:
1、升级:libsodium 到 1.0.16。
2017 年 11 月 25 日:
1、如果 Linux 内核版本大于 3.7.0,则配置文件默认支持 TCP fast open;
2、新增:libev 版启动时支持 verbose mode,也就是默认写 log 到 /var/log/messages 方便查看。
2017 年 11 月 12 日:
1、新增生成 ss:// 或 ssr:// 链接,以及其二维码图片。
※ 脚本会根据当前安装的版本以及输入的各项配置,自动生成 ss:// 或 ssr:// 的链接并在安装成功后显示,直接复制即可被客户端识别。同时生成其二维码图片,并保存在当前目录下,下载后用看图软件打开,也能被客户端识别。
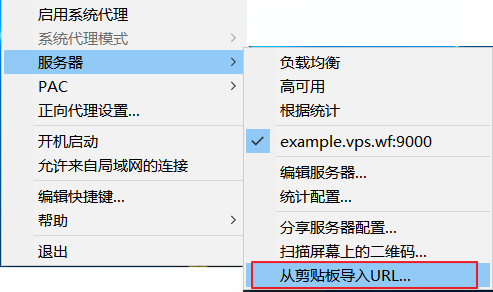
复制二维码链接后 Shadowsocks 客户端识别示例:

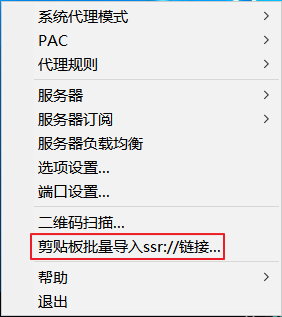
复制二维码链接后 ShadowsocksR 客户端识别示例:

二维码(QR Code)参考链接:
https://github.com/shadowsocks/shadowsocks/wiki/Generate-QR-Code-for-Android-or-iOS-Clients
https://github.com/shadowsocksr-backup/shadowsocks-rss/wiki/SSR-QRcode-scheme
2017 年 10 月 22 日:
1、升级:libsodium 到 1.0.15。
2017 年 10 月 14 日:
1、新增:在安装 Shadowsocks-libev 版时可选安装 simple-obfs 服务端。
※ 脚本通过判断 autoconf 版本是否大于或等于 2.67 来一键安装 simple-obfs 服务端。并且,支持在安装过程中选择 obfs 为 http 或 tls。
※ 使用方法参考:https://teddysun.com/511.html
2017 年 09 月 16 日:
1、修正:Shadowsocks-libev 版 v3.1.0 使用 libc-ares 替换 libudns 依赖包,解决了依赖问题;
2、升级:mbedtls 到版本 2.6.0。
2017 年 07 月 27 日:
1、新增:ShadowsocksR 版可选协议(protocol)auth_chain_b 。使用该协议需更新到最新(4.7.0) ShadowsocksR 版客户端;
2、修改:更新 ShadowsocksR 源码下载地址。
2017 年 07 月 23 日:
1、修正:卸载时可自行选择某个版本卸载,若该版本不存在则报错退出。
2017 年 07 月 22 日:
1、修正:默认加密方式从 aes-256-cfb 改为 aes-256-gcm(Python 和 libev 版);
2、新增:安装时可选 16 种加密方式的其中之一(Python 和 libev 版)。如下所示:
aes-256-gcm
aes-192-gcm
aes-128-gcm
aes-256-ctr
aes-192-ctr
aes-128-ctr
aes-256-cfb
aes-192-cfb
aes-128-cfb
camellia-128-cfb
camellia-192-cfb
camellia-256-cfb
chacha20-ietf-poly1305
chacha20-ietf
chacha20
rc4-md5
3、新增:安装时可选 9 种加密方式的其中之一(Go 版)。如下所示:
aes-256-cfb
aes-192-cfb
aes-128-cfb
aes-256-ctr
aes-192-ctr
aes-128-ctr
chacha20-ietf
chacha20
rc4-md5
4、新增:安装时可选 15 种加密方式的其中之一(none 是不加密,ShadowsocksR 版)。如下所示:
none
aes-256-cfb
aes-192-cfb
aes-128-cfb
aes-256-cfb8
aes-192-cfb8
aes-128-cfb8
aes-256-ctr
aes-192-ctr
aes-128-ctr
chacha20-ietf
chacha20
salsa20
xchacha20
xsalsa20
rc4-md5
5、新增:安装时可选 7 种协议(protocol)的其中之一(仅限 ShadowsocksR 版)。如下所示:
origin
verify_deflate
auth_sha1_v4
auth_sha1_v4_compatible
auth_aes128_md5
auth_aes128_sha1
auth_chain_a
auth_chain_b
6、新增:安装时可选 9 种混淆(obfs)的其中之一(仅限 ShadowsocksR 版)。如下所示:
plain
http_simple
http_simple_compatible
http_post
http_post_compatible
tls1.2_ticket_auth
tls1.2_ticket_auth_compatible
tls1.2_ticket_fastauth
tls1.2_ticket_fastauth_compatible
2017 年 02 月 24 日:
1、恢复: 通过 Github API 自动获取 Shadowsocks-libev 的最新 release 版本的功能(v3.0.3)。
2017 年 02 月 13 日:
1、升级: Shadowsocks-libev 版到版本 3.0.2;
2、升级: Shadowsocks-go 版到版本 1.2.1(基于 Github 最新代码,用 go 1.8 编译完成的 x86 和 x86_64 二进制文件);
3、修复:在 Debian 7 下默认没有 libudns-dev 依赖包的问题。
2017 年 02 月 12 日:
1、升级: Shadowsocks-libev 版到版本 3.0.1。
2017 年 01 月 27 日:
1、升级: Shadowsocks-go 版到版本 1.2.1 (仅适用于 x86_64 系统)
更多单版本 Shadowsocks 服务端一键安装脚本
Shadowsocks Python 版一键安装脚本(CentOS,Debian,Ubuntu)
ShadowsocksR 版一键安装脚本(CentOS,Debian,Ubuntu)
CentOS 下 Shadowsocks-libev 一键安装脚本
Debian 下 Shadowsocks-libev 一键安装脚本
Shadowsocks-go 一键安装脚本(CentOS,Debian,Ubuntu)
注意:以上单版本不可与该四合一版本混用。
转载请注明:秋水逸冰 » Shadowsocks 一键安装脚本(四合一)
